
Step 1: Implementing the search bar
This step introduces the concept of a linkki PMO. You will learn how to create a so-called section with such a PMO and the annotation @UISection. Along with that, you will also be introduced to the first component annotations @UITextField and @UIButton.
|
The linkki archetype already provides the fundamental setup for your BusinessPartnerView. In this step, you will create an input field in the view where the user can enter a search term and trigger the search.
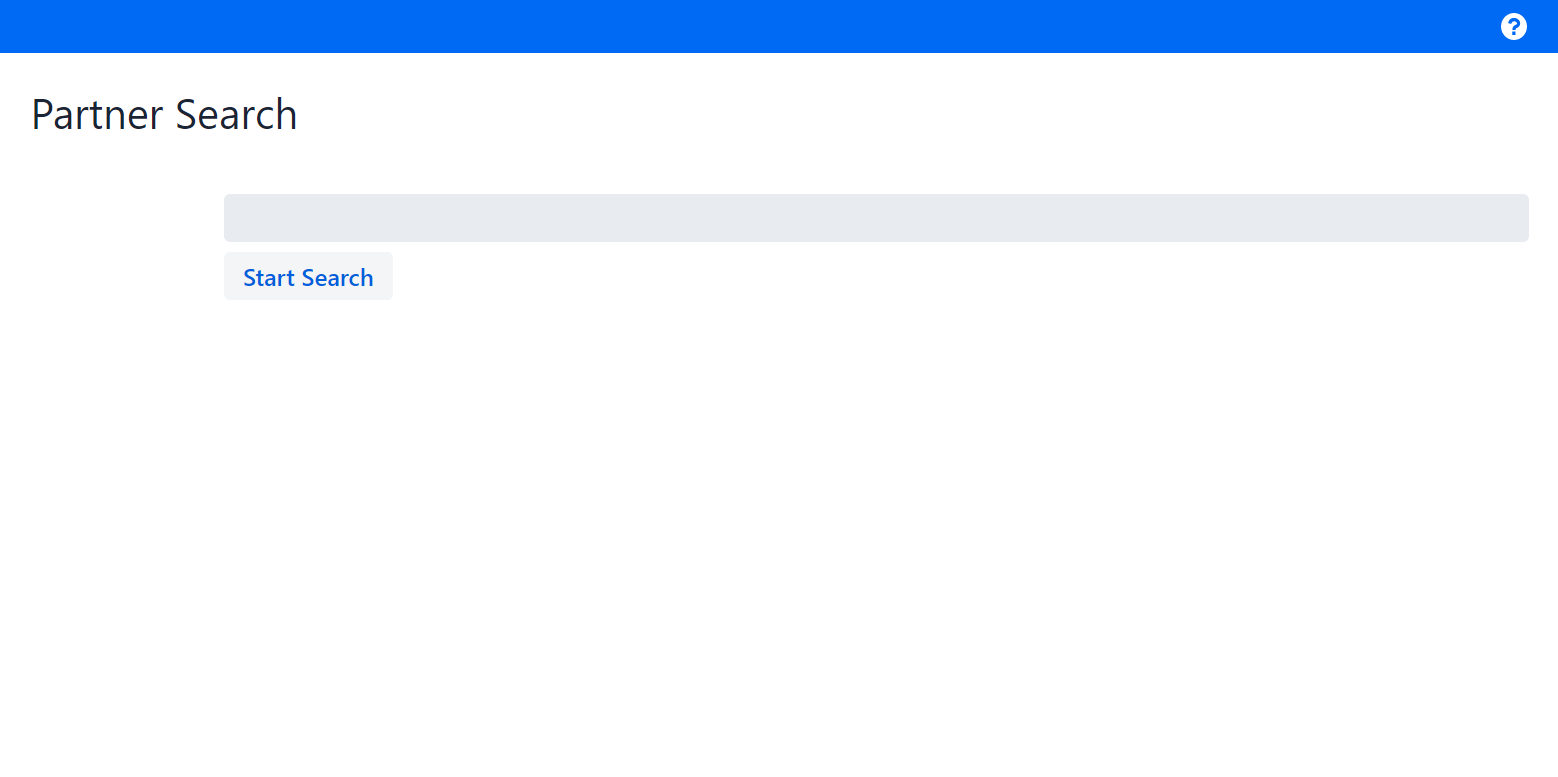
Figure 1. Search bar and button
Creating the section to enter search criteria
In linkki, each layout element is repesented by a Presentation Model Object (PMO) that is annotated with a layout annotation. The most commonly used layout is the section (@UISection).
|
To start with the first layout, create a class with the name SearchSectionPmo and annotate it with @UISection.
To implement the text field for search term input, follow the following steps:
-
Create a new field
searchTextthat stores the user’s input. -
Create and implement the getter method for the property
searchTextwith the signatureString getSearchText(). -
Annotate the getter method with
@UITextField. The annotation requires a valuepositionwhich can set to an arbitrary positive integer value, e.g. 10. -
Create and implement the setter method for the property
searchText. This method should have the signaturepublic void setSearchText(String).
The finished implementation looks like this:
SearchSectionPmo.java
@UISection
public class SearchSectionPmo {
    private String searchText = "";

    @UITextField(position = 10, label = "")
    public String getSearchText() {
        return searchText;
    }

    public void setSearchText(String searchText) {
        this.searchText = searchText;
    }
}| Just like layouts, input components are also represented by annotations. The built-in annotations cover the components that are most commonly used in a form. It is also possible to create your annotations for custom components. |
The UI element UITextField is declared via the annotation @UITextField. It is followed by two properties: position and label.
The attribute position defines the display order of the components inside of a layout.
|
|
The getter method that is annotated with UI element annotation determines what is displayed in the field. The setter method defines what happens with the user input. The mechanism of a PMO is further explained in the documentation. In summary, whenever the user input changes, the The following image illustrates the data binding for the property 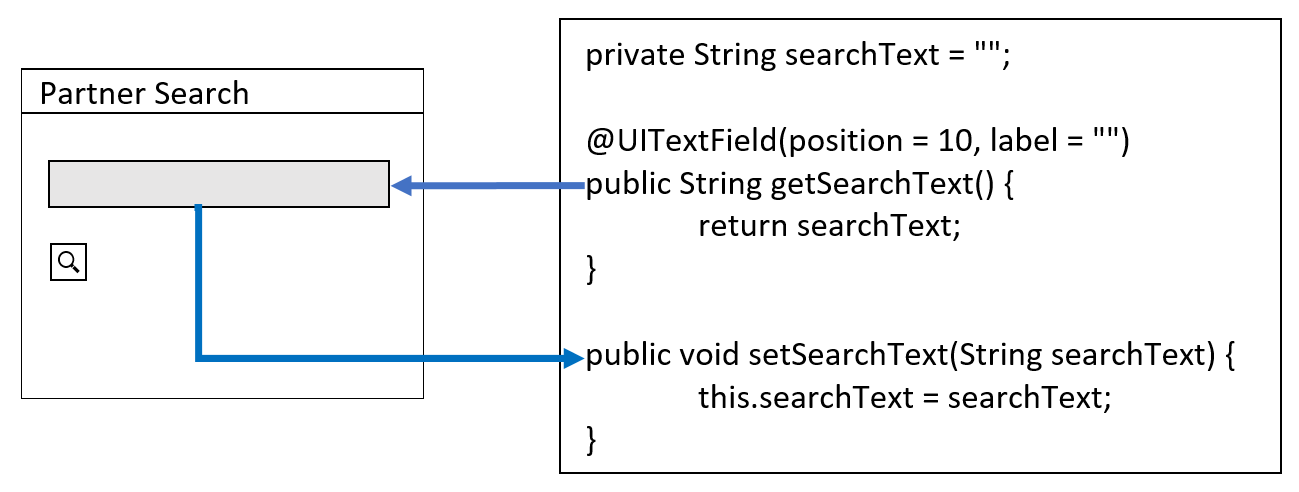
Figure 2. Data binding
|
-
Create a new field
searchConsumerof typeConsumer<String>. -
Create a constructor with the signature
SearchSectionPmo(Consumer<String>)which assigns the argument to the fieldsearchConsumer. -
Create a new method
searchwith the signaturepublic void search() -
Implement the method with
searchConsumer.accept(searchText) -
Annotate the method with
@UIButton.-
The
positionshould be higher than the position of@UITextField, e.g. 20. -
The
captionshould be set to "Start Search".
-
The finished implementation should look like this:
SearchSectionPmo.java
private Consumer<String> searchConsumer;

public SearchSectionPmo(Consumer<String> searchConsumer) {
    this.searchConsumer = searchConsumer;
}

@UIButton(position = 20, caption = "Start Search")
public void search() {
    searchConsumer.accept(getSearchText());
}
As a button do not store any values, the annotation is not added to a getter method, but a void method. Whenever the user clicks on the button, the method search() is invoked. The corresponding PMO property is called search.
|
The search action itself is a functionality that should not be directly implemented in the PMO as it requires interaction with external systems. Thus it should be passed to the PMO as a constructor argument.
In your application, you will often use the functional interfaces org.linkki.util.handler.Handler and Consumer<T> in order to separate a button’s execution logic from its definition within the Presentation Model Object (PMO) classes. The Handler is a representation of a method without arguments and without a return value.
|
Creating and showing SearchSectionPmo on a Page
Now that you have the search input section, follow the following steps to create and display the section represented by SearchSectionPmo:
-
Create a Class
SearchPagethat extendsAbstractPage. -
Create a field
bindingManagerof type BindingManager and initialize it withnew DefaultBindingManager(). -
Implement the method
getBindingManager()which returns the fieldbindingManager. -
Define a new method
public void search(String)with no implementation yet. -
Implement the method createContent with
addSection(new SearchSectionPmo(this::search)).
The finished implementation should look like this:
SearchPage.java
public class SearchPage extends AbstractPage (1)
{
    private final BindingManager bindingManager = new DefaultBindingManager();

    public SearchPage(BusinessPartnerRepository partnerRepository) {
        this.partnerRepository = partnerRepository;
    }

    @Override
    protected BindingManager getBindingManager() {
        return bindingManager;
    }

    @Override
    public void createContent() {
        addSection(new SearchSectionPmo(this::search));
    }

    public void search(String searchText) {
        // will be implemented later
    }
}| 1 | AbstractPage is an implementation of Page by linkki in which sections can be conveniently created and added by providing the corresponding PMOs. |
Next, implement the search functionality as follows:
-
Create a new field
foundPartnerswith the typeList<BusinessPartner>to store the search results. -
Initialize the field
foundPartnerswithnew ArrayList<>(). -
Extend the constructor of
SearchPagewith an additional argument of typeorg.linkki.samples.appsample.model.BusinessPartnerRepository. This type is provided by the dependencysample-modeland implements the seach functionality. -
Store the constructor argument in a new field
partnerRepository. -
Implement the method
search: Execute the methodfindBusinessPartnerfrompartnerRepositorywith the method argument and store the result in the fieldfoundPartners.
The finished implementation should look like this:
SearchPage.java
private final BusinessPartnerRepository partnerRepository;
private final List<BusinessPartner> foundPartners = new ArrayList<>();

public void search(String searchText) {
    var searchResults = partnerRepository.findBusinessPartners(searchText);
    foundPartners.clear();
    foundPartners.addAll(searchResults);
}
Showing SearchPage in BusinessPartnerView
The SearchPage is still not displayed yet. To create and display the page, go to the class BusinessPartnerView and modify the class as followed:
-
Extend the constructor with an argument of type
BusinessPartnerRepository. -
Annotate the constructor with
@Autowired. -
Create a new
Headlineusing the constructor and the argument"Partner Search"and add it to the view withadd. -
Create a new
SearchPageusing the constructor. -
Call the
init()method of the createdSearchPageto create the content of the page and add the createdSearchPageto the view withadd.
The finished implementation should look like this:
BusinessPartnerView.java
@Autowired
public BusinessPartnerView(BusinessPartnerRepository repository) {
    Headline headline = new Headline("Partner Search");
    add(headline);
    SearchPage searchPage = new SearchPage(repository);
    searchPage.init();
    add(searchPage);
}
The method AbstractPage.init() takes care of creating the page after the constructor has been called.
Viewing the result in the application
If you run your application now, you should be able to see the SearchSectionPmo. The view begins with the title "Partner Search" and is followed by a search bar and a search button called "Start Search".
Figure 3. Search bar and button
For now, clicking the search button does not affect the UI. The next step extends the UI to display the search result.