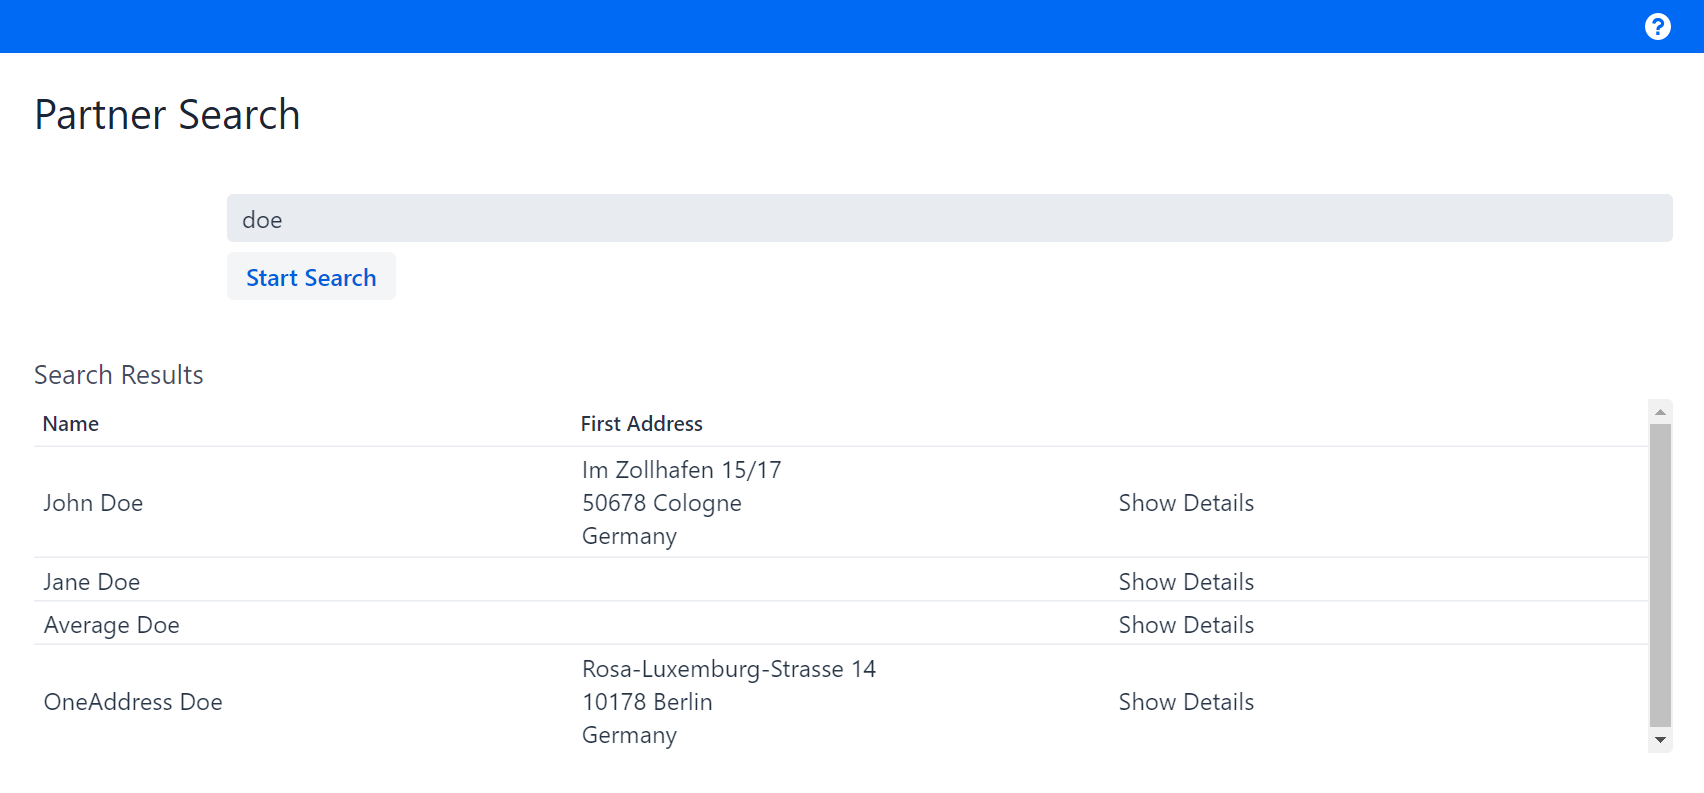
Step 2: Displaying the search result in a table
This step teaches you how to implement a table using SimpleTablePmo. Additionally, you will be introduced to the UI elements UILabel and UILink.
|
To display the search results, matching business partners should be shown in a table below the search bar. The user should only be able to gather brief information about the business partner for now.

Creating the search result table
To build a table in linkki, you need two PMO classes:
-
A row PMO that defines the structure of one row of the table.
-
A
ContainerPmothat builds the table out of the rows.
Implementing the Row PMO
Create a new class SearchResultRowPmo as the row PMO of the table.
Unlike a ContainerPmo, a row PMO is not a section and therefore doesn’t need the @UISection annotation.
|
Every row consists of three elements:
To implement the SearchResultRowPmo, do the following:
-
Create a constructor with the signature
SearchResultRowPmo(BusinessPartner partner)which assigns the argument to a fieldpartner. -
Create and implement the getter method for the property
name. -
Annotate the getter method with
@UILabel. Thelabelattribute will be the column name. It should be set to "Name". -
Create and implement the getter method for the property
firstAddress. -
Annotate this getter method with
@UILabelas well. The label should be set to "First Address". -
Create the getter method for the property
details. This method should return a URL as a String, but let it return an empty String for now. -
Annotate the method with
@UILink. The attributecaptionshould be set to "Show Details".
The finished implementation should look like this:
@UILabel(position = 10, label = "Name")
public String getName() {
    return partner.getName();
}

@UILabel(position = 20, label = "First Address")
public String getFirstAddress() {
    return partner.getFirstAddress();
}

@UILink(position = 30, caption = "Show Details")
public String getDetails() {
    return "";
}
Implementing the Container PMO
Create a new class SearchResultTablePmo, which will be the ContainerPmo of the table and implement it as follows:
-
Use
SimpleTablePmo<BusinessPartner, SearchResultRowPmo>as super class. -
Annotate the class with
@UISectionand set the attributecaptionto "Search Results". This is the caption of the section that contains the table. -
Implement the constructor with the signature
SearchResultTablePmo(Supplier<List<? extends BusinessPartner>> modelObjectsSupplier)by passing the argument to the super class. -
Implement the method
createRowwhich returns a new instance ofSearchResultRowPmo.
The finished implementation should look like this:
@UISection(caption = "Search Results")
public class SearchResultTablePmo extends SimpleTablePmo<BusinessPartner, SearchResultRowPmo> {

    public SearchResultTablePmo(Supplier<List<? extends BusinessPartner>> modelObjectsSupplier) {
        super(modelObjectsSupplier);
    }

    @Override
    protected SearchResultRowPmo createRow(BusinessPartner partner) {
        return new SearchResultRowPmo(partner);
    }
}
The SimpleTablePmo deals with the creation of the table and calls the method SearchResultTablePmo.createRow for each partner in the BusinessPartner list.
|
Adding the table to SearchPage
To display the defined table in the search page, you need to do the following:
-
In the method
createContent():-
Create a new instance of
SearchResultTablePmoand pass the listfoundPartnersas a lambda expression. -
Add a section with the created
SearchResultTablePmothe same way as the sectionSearchSectionPmo.
-
The finished implementation should look like this:
@Override
public void createContent() {
    addSection(new SearchSectionPmo(this::search));
    addSection(new SearchResultTablePmo(() -> foundPartners));
}
If you start the application now, you can search for an arbitrary name and see all the matching business partners in the result table below the search bar. For example, when searching for "doe", you should get a table with four results: John Doe, Jane Doe, Average Doe and OneAddress Doe. Only John Doe and OneAddress Doe have a first address.

For now, the UILink is not clickable. It will be made clickable in the next step, which deals with the navigation between views.
